Tag Archives: wordpress.com

Quick How-To: add a static welcome page to WordPress.com without losing your blog

Hi, guys!

I’ve been MIA for a couple of weeks, and for a good reason – as you’ve probably noticed, I am now running #ComedyBookWeek. It’s been a full-time job for the last month or so, what with setting up an official website, approaching 100 book bloggers, and gathering 112 (and counting) books to participate. Not to mention the daily highlights and social media – luckily I’m on leave right now, otherwise, I’d have a nervous breakdown!

Still, I had to take a little timeout and post this How-To, because it took me forever to figure out what should take you five minutes to do. If you’ve looked on #ComedyBookWeek webpage lately, you might have noticed that the front page is now a static one, showcasing all the books on offer. To see the actual blog posts, you now need to click on the “Blog” tab at the top. This makes the page look more professional from the event point of view, rather than the WordPress standard landing page being a blog. Plus, it gives more weight to the books on offer. Incidentally, this is what most professional authors do – when you go to their website, the welcome page is about the author and their books. I am going to revamp this blog in the same way, so I wanted to give you heads up and write down how I did it for #ComedyBookWeek webpage .

Please follow the steps below exactly – if you only assign the front page, you will notice that your blog will DISSAPEAR! And we don’t want that.

Here are the steps:

  1. Create a landing Page that you want to be your “front” page. For this blog, it will be my “About Ana” page. Here are all the pages used in comedybookweek.com:Add page
  2. Create a “Blog” page. Just trust me – add a new page, call it “Blog” or whatever you want, but DON’T WRITE ANYTHING in the body/text box.
  3. Now go to your WP Admin, and in Settings-Reading, assign two static pages as shown below. Assign your welcome page to “Front” and your empty “Blog” page to “Posts.”Reading settings
  4. In Appearance-Menus, add pages and rearrange them as desired. Here’s what #ComedyBookWeek menu looks like:Menus

That’s it!

You’re welcome 🙂

22 Comments

Filed under Self-publishing and marketing

How to make Goodreads giveaway widget work on WordPress.com

Have you tried and failed to include Goodreads Giveaway widget on your WordPress.com site? Have you tried reading forums, only to find that the reason for it is that Goodreads uses Java or whatever else WordPress.com doesn’t allow? Oh, good, so I’m not the only one…

I was so frustrated with this previously, that I created a work-around using an image widget. I was happy with that for a while, but the image suggested that only few people have requested my book, when in actuality it was 1,699 over 2 weeks! I have just started a new giveaway, and already over 350 people have requested a copy, in less than 15 hours!

So I found a different work-around. Cause I just don’t take “no” for an answer and cause I feel omni-potent, having learned the very basics of HTML. Also, probably, cause I’m Russian-born, and we’ve been known to fix space stations with hammers. In movies, mind you, but that’s probably not that far from the truth.

WARNING: my method is equivalent to smashing the widget with a hammer. If you are a programmer, avert your eyes…

To start with, you need to get the code, which is available on your giveaway page:

Giveaway code

Then you need to create a new text widget in WordPress.com, copy and paste the Goodreads html code into its content window. Unfortunately, this is what it will look like on your website:

Giveaway widget before deletions

Ugh, right? Enough to make you want to give up…unless you are willing to keep smashing the widget playing with code until you figure out what needs to be deleted. Feel free to play yourself, or follow these simple steps:

STEP 1: delete all of this code from the beginning of the code script, up to and including this bit:
.goodreadsGiveawayWidgetEnterLink:hover {
color: #181818;
background-color: #F7F2ED;
border: 1px solid #AFAFAF;
text-decoration: none;
}

Have a look at the picture above – it is basically the naked HTML that was visible above the “Goodreads Giveaway” title.

STEP 2: delete the very end of the script:

<a class=”goodreadsGiveawayWidgetEnterLink” href=”https://www.goodreads.com/giveaway/enter_choose_address/168663″>Enter Giveaway</a>
</div>
</div><a href=”https://www.goodreads.com/giveaway/widget/168663″>https://www.goodreads.com/giveaway/widget/168663</a&gt;

That’s the link to the actual entry form. Unless you want to keep it, but I prefer the cleaner look, which goes to the giveaway page.

STEP 3: play with the code! For example:

A. I found the “text-align: center” and changed it to “text-align: left” to match my other widgets.

B. Clicking on the picture took you to the book page (with giveaway button underneath). I wanted it to point directly to the giveaway page – so I found the page I wanted, copied the url, then found the following bit of code in the second paragraph and carefully replaced the http address with the preferred one:

highlighted code

That’s it! Once you are happy with the way it looks, move the widget to the desired position, and voila! It looks great in my sidebar now.

Have fun!

15 Comments

Filed under Self-publishing and marketing

How to make a “floaty” banner in WordPress.com

Did you know that if you pay for the Premium account, you not only get rid of pesky third-party ads, you also get a list of benefits you are probably not using? Like CSS, or custom design?

I’m kind of excited and scared at the same time – I’m one of those people that knows how to drive cars and use computers, but not exactly sure how the cars or computers work. Still, I’m not gonna fall behind the times – I have to regularly force myself to try something new. Like buying a Surface Pro, even though it means a week of crying “Where did my file go?” and “I want my Grandpa PC back!”

This time it will be “Oh my God, what have I done to my website?”

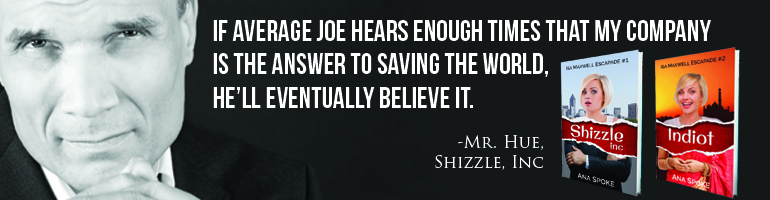
By the way, have you noticed what I’ve done? It’s in the right top corner – see the invitation to buy my book? See how it won’t go away, no matter how fast you scroll? Cool, huh…do you want one for your website? I will walk you through it step-by step while it’s still fresh in my mind.

I started with WordPress support post on Custom design. I didn’t understand half of it, except that you can “try it now” without purchasing an upgrade, which is a good news for those with the free accounts.

I then read through some of the CSS Customization Forum, backed away from the computer, and cried quietly in the corner. That’s my process, okay? You should have seen how much I cried over essays in highschool…anyway, the Forum will be a good resource later on, when I start getting all fancy with my trickery. For now, I will climb the mountain  one step at a time. The first step I’d decided to take is create one of those (mildly obnoxious) floating invitations to buy your book or sign up for an email list. I have to credit alfageek with generously sharing the original code for an invitation to buy a book. Turns out that once you have a base to work from, learning CSS can be a lot of fun as you tinker with values and then refresh madly, to see what your tinkering has done.

Ok, now for the promised easy steps:

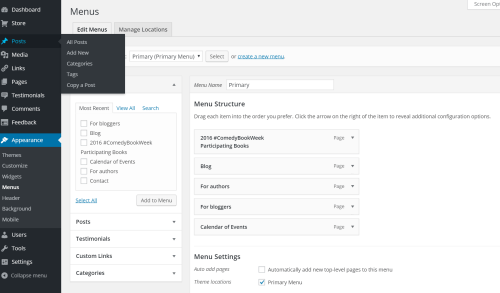
STEP 1. Make a widget of your banner – have a look at how to create a widget for your Amazon book or how to create a widget using Amazon affiliate link.

STEP 2. Once you have a working widget, go to the wp-admin version of your site, and click on Appearances-Customise-CSS. This is what my CSS looks like now, with custom code beginning on line 6:

CSS code

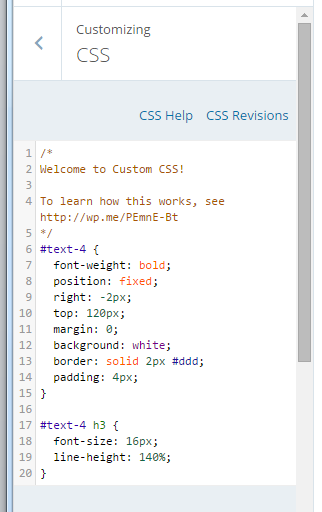
STEP 2. Copy this code and paste it to your CSS window:

#text-4 {
font-weight: bold;
position: fixed;
right: -2px;
top: 120px;
margin: 0;
background: white;
border: solid 2px #ddd;
padding: 4px;
}

#text-4 h3 {
font-size: 16px;
line-height: 140%;
}

STEP 3. Almost finished! Change number “4” in lines 6 and 17 above to the order of your widget in the sidebar. So, if your widget is at the very top, change it to read “text-1” and so forth.

THAT’S IT! Now, the fun part! Play with the code line-by-line and see what it does:

6. “text-4” refers to my widget being #4 in the sidebar. Change number to reflect the order position of your widget.

7. optional line – if you delete it, the font will not be bold.

8. “fixed” position means it will stay put while you scroll through the page.

9. “right” can be replaced with “left” – that’s where it will appear on the page. -2px refers to how far it is from the edge. Mine has a 2px (2 pixels) border around it, so -2px shaves off the border on the right.

10. “top” can be replaced by “bottom”. Play around with the pixel number until you get it to the exact spot you want.

11.”margin” – add a margin, if you wish. I have none.

12. “background” – I have white. Have a look at CSS Tricks for codes to some alternative colors.

13. “border” – change pixel number to make it thicker, or delete this line if you don’t want a border. Change color code to match your website.

14. “padding” – controls the amount of background space around the text. Increase the number to make your banner larger, while the text stays the same.

15, 16 and 17 – I have no idea, just leave as is or play with it.

18. “font size” – did not seem to make a difference, perhaps it’s a combination of font size and line height (line #19).

19. change line height to make font larger.

Have fun!

29 Comments

Filed under Self-publishing and marketing

Quick How-To: adding a link to Amazon from your WordPress.com blog

You may have noticed that at the top of this blog’s right-hand sidebar there’s now a pic of the Shizzle, Inc cover with an invitation to download. If you click on it, it will take you straight to Amazon Kindle (the American one).

You may also wonder why I haven’t done it to begin with, as soon as the novel was published. The answer is, I couldn’t. In my naivete, I assumed that there would be an easy-to-use widget like the one WordPress.com has for Goodreads, but there isn’t one. I don’t know why. Maybe WordPress and Amazon have had a falling out, Like Paris Hilton and Nicole Richie. All I know is that setting up this little link was a pain.

I won’t take you through everything that I had to go through – suffices to say that there’s A LOT of useless, outdated advice out there. In summary, THIS WILL NOT WORK:

  • Trying to insert HTML code, as per Kindle own instructions. This is probably meant for WordPress.org websites.
  • Trying to use Text Widget.
  • Trying to use any other widget, like Goodreads, and posting a url somewhere. (Ok, so it was a stupid idea, but innovative!)
  • Crying.

JUST DO THIS:

1.  Add an image of your cover to your media library (see Media in Admin sidebar).

2.  Add an Image Widget (go to Appearance – Widgets in Admin sidebar). The dialog box will look like this:

Capture of image widget

3.  Put a widget title in, if desired. I put in “Download Shizzle, Inc.

4. Now go back to your media library, find your cover image and double-click on it. You will see this:

Capture of image in image library

See the box in the top right corner? Copy THAT url (ignore the permalink or the “shortlink”).

5. Paste the url in your Image Widget.

6. Save and move the widget up in your sidebar (if desired).

7. Go back to your website and admire the results!

Hope this has helped or will help you in the future. It will certainly help me when I get to post my second novel, cause I’m guaranteed to forget it all by then.

51 Comments

Filed under Self-publishing and marketing